
There are some foods that hold special memories, that take you back to a certain time or place. Pyrohi are one of those for me. I remember devouring them at my grandparent's house as a child. I learned to ride my bike (sans training wheels) by having my parents tempt me by saying "Olga's Pieroghi!" as they ran ahead of me and I tried to catch up. Engrossed by the thoughts of buttery, cheese and potato filled pockets, I completely forgot about my unbalanced self and raced to two wheels in no time. The smell of onions sauteing in butter on the stove top still reminds me of home and Olga's (my grandmother) kitchen.

Since I grew up, I've tried several varieties: the can't be topped pyrohi made by little old ladies in church basements, the store bought kind from your grocer's freezer, and some bought at specialty markets with unique added flavors. There is also a "poor man's" version that my dad makes, which is basically the same ingredients deconstructed in a mixture of noodles as opposed to pinched into dough rounds. It's equally delicious and I'll have to share it with you sometime.
I wanted to give homemade pyrohi a try, not only because I imagine that they will taste more like the little old lady variety, but also because they are a great weeknight dish since they freeze so well. Once they are individually frozen onto sheet pans (don't forget the parchment paper), I put a few into zip top bags and placed them in the freezer. On busy weeknights, it's so easy to boil a pot of water and throw in some frozen pyrohi, saute some butter/olive oil and onions and sit down to a nice, home cooked meal 15 minutes later.
This leads me to my current undertaking: making homemade pyrohi. The recipe below is what I received from my Aunt Stephanie (a young church basement pyrohi pincher) at my bridal shower. I had to have some tweaks (for my allergy), but I've mostly followed this exactly (the items I've changed will not be in italics).
Ukrainian Pyrohi
(yield: approx. 3 to 3 1/2 doz)
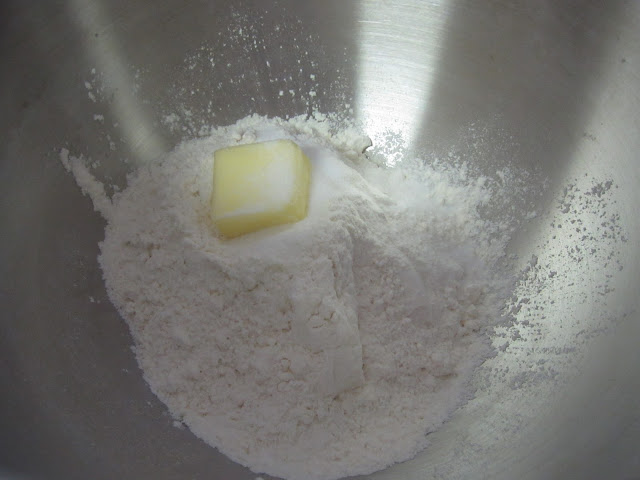
Dough
1 egg
2 c. flour
1/2 c. water
1 tbsp. margarine (for which I subbed plain ol' butter)
1 tsp. salt
Mix together and knead for about 5 minutes. You can also let your mixer and dough hook do the work. Let dough rest on a floured board for about 1/2 hour.

Filling

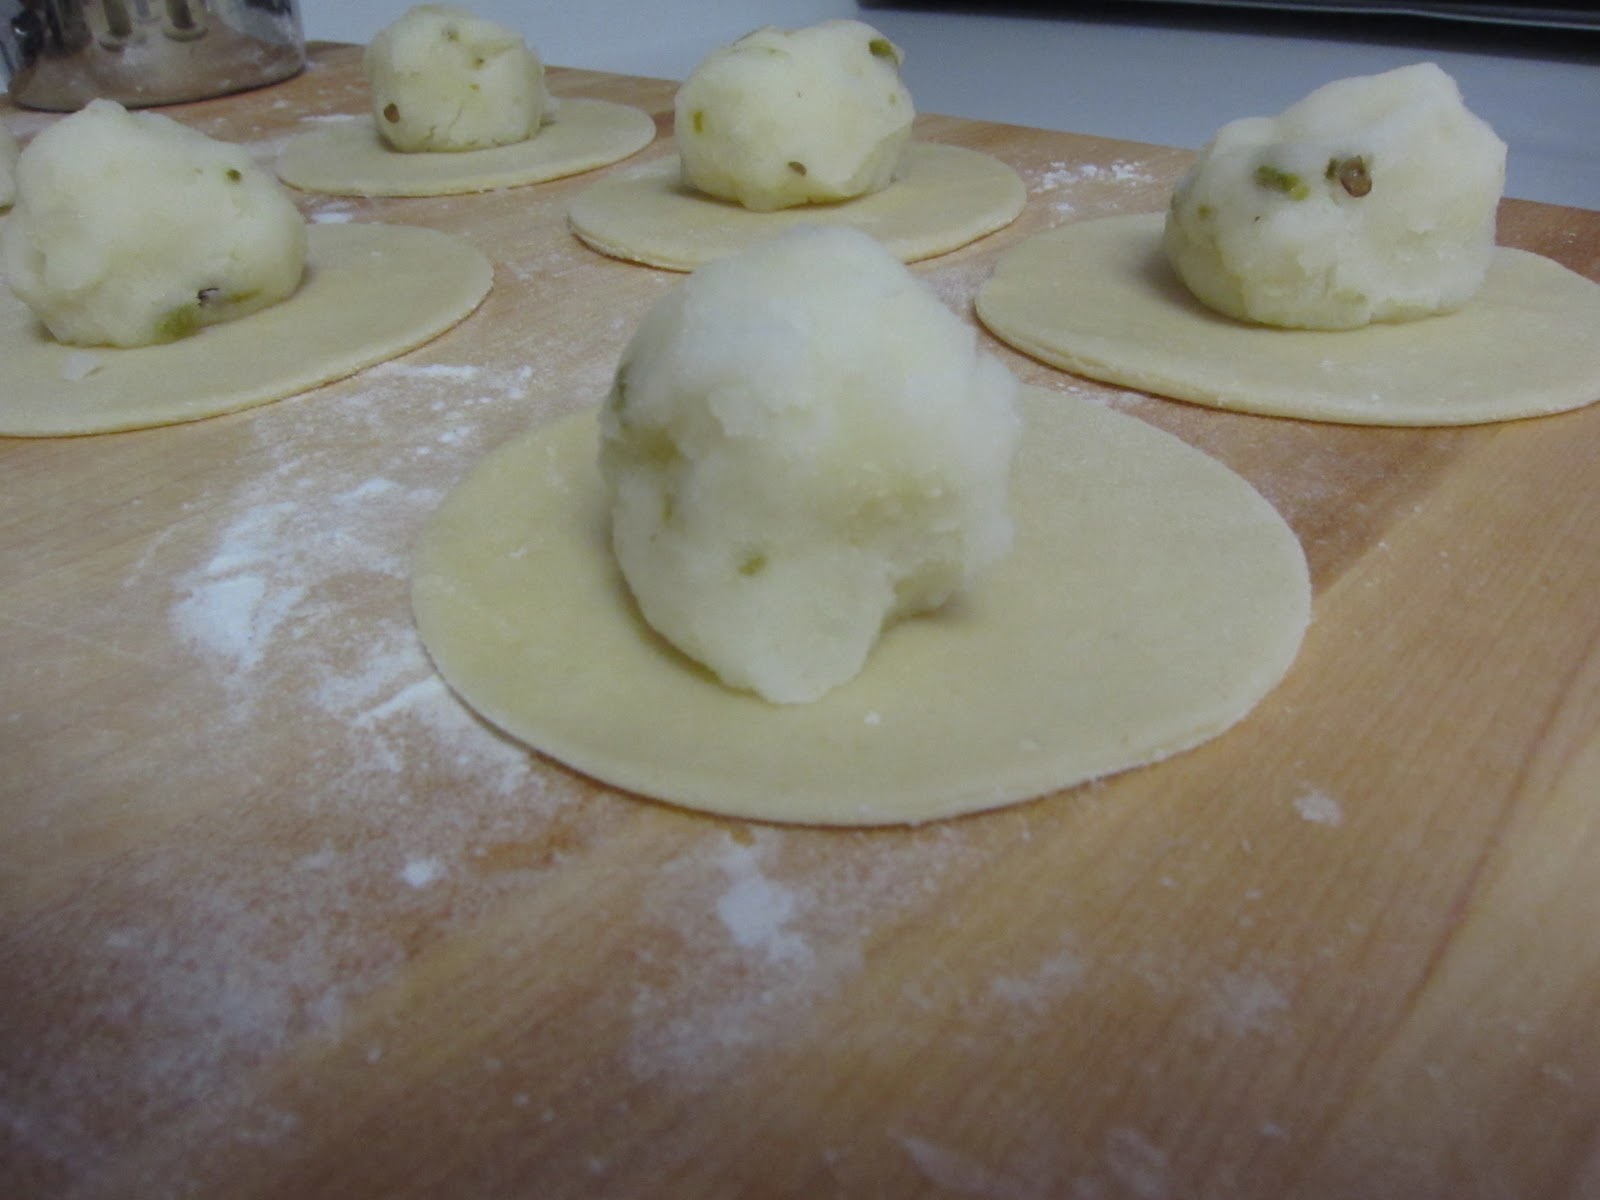
Cook 5 or 6 potatoes (pared and cubed). Mash, add salt and pepper to taste (do not add milk); add 3 or 4 slices of cheddar, American or your choice of cheese (I used Manchego* here). Mix well until cheese is melted. I like to saute butter (I used olive oil) and onions (1/2 yellow) and put some into the potato mixture. Scoop potatoes into 1" balls and let cool.
Making and Filling Pyrohi
Roll out dough about 1/8" thick and cut in 3" rounds (use a donut cutter). Put 1 tbsp. potatoes on a round and pinch them shut. Use a little flour on your fingers if the dough is sticky or if it doesn't seal right away. No need to put water on the edges before sealing. I worked in batches so that the dough wouldn't dry out.


Put completed pyrohi on a lightly floured surface until ready to cook. If not cooking for a while, cover the pyrohi with a dish towel until ready to cook so that they don't dry out.


Cook in a large pot of boiling water, stirring gently until pyrohi come to the top of the water and then let simmer for 3 or 4 minutes; drain, serve with sauteed butter (again, I used olive oil) and onions. ENJOY!
The other option is to fry them. I caramelized some yellow onions in some olive oil and once they were done, added a bit more olive oil and sauteed the pyrohi until they were cooked through.

To kick these up a notch, mix the pyrohi filling (as directed above) and add one roasted, peeled and diced jalapeno pepper. The spiciness goes well with the caramelized onions and it really is an great twist on the traditional version (although I can't say enough about the original).


*Manchego is a sheep's milk cheese that has goes really well with potatoes and melts well. There are also sheep and goat's milk cheddars available, but our nearest specialty cheese store is an hour away.

Since I grew up, I've tried several varieties: the can't be topped pyrohi made by little old ladies in church basements, the store bought kind from your grocer's freezer, and some bought at specialty markets with unique added flavors. There is also a "poor man's" version that my dad makes, which is basically the same ingredients deconstructed in a mixture of noodles as opposed to pinched into dough rounds. It's equally delicious and I'll have to share it with you sometime.
I wanted to give homemade pyrohi a try, not only because I imagine that they will taste more like the little old lady variety, but also because they are a great weeknight dish since they freeze so well. Once they are individually frozen onto sheet pans (don't forget the parchment paper), I put a few into zip top bags and placed them in the freezer. On busy weeknights, it's so easy to boil a pot of water and throw in some frozen pyrohi, saute some butter/olive oil and onions and sit down to a nice, home cooked meal 15 minutes later.
This leads me to my current undertaking: making homemade pyrohi. The recipe below is what I received from my Aunt Stephanie (a young church basement pyrohi pincher) at my bridal shower. I had to have some tweaks (for my allergy), but I've mostly followed this exactly (the items I've changed will not be in italics).
Ukrainian Pyrohi
(yield: approx. 3 to 3 1/2 doz)
Dough
1 egg
2 c. flour
1/2 c. water
1 tbsp. margarine (for which I subbed plain ol' butter)
1 tsp. salt
Mix together and knead for about 5 minutes. You can also let your mixer and dough hook do the work. Let dough rest on a floured board for about 1/2 hour.


Filling

Cook 5 or 6 potatoes (pared and cubed). Mash, add salt and pepper to taste (do not add milk); add 3 or 4 slices of cheddar, American or your choice of cheese (I used Manchego* here). Mix well until cheese is melted. I like to saute butter (I used olive oil) and onions (1/2 yellow) and put some into the potato mixture. Scoop potatoes into 1" balls and let cool.
Making and Filling Pyrohi
Roll out dough about 1/8" thick and cut in 3" rounds (use a donut cutter). Put 1 tbsp. potatoes on a round and pinch them shut. Use a little flour on your fingers if the dough is sticky or if it doesn't seal right away. No need to put water on the edges before sealing. I worked in batches so that the dough wouldn't dry out.
Put completed pyrohi on a lightly floured surface until ready to cook. If not cooking for a while, cover the pyrohi with a dish towel until ready to cook so that they don't dry out.

Cook in a large pot of boiling water, stirring gently until pyrohi come to the top of the water and then let simmer for 3 or 4 minutes; drain, serve with sauteed butter (again, I used olive oil) and onions. ENJOY!
The other option is to fry them. I caramelized some yellow onions in some olive oil and once they were done, added a bit more olive oil and sauteed the pyrohi until they were cooked through.

To kick these up a notch, mix the pyrohi filling (as directed above) and add one roasted, peeled and diced jalapeno pepper. The spiciness goes well with the caramelized onions and it really is an great twist on the traditional version (although I can't say enough about the original).

*Manchego is a sheep's milk cheese that has goes really well with potatoes and melts well. There are also sheep and goat's milk cheddars available, but our nearest specialty cheese store is an hour away.
Hi,
ReplyDeleteI spotted your post on perogies and just had to take a look. What a great tutorial and photos. I'm so glad to see a Ukrainian alter the traditional recipe. I apparently got chastised by some Ukrainian and Polish ladies who got wind of my recipe post. According to a Ukrainian girlfriend, they were beside themselves that I would actually drizzle some balsamic reduction on the sour cream. Being Italian I couldn't resist, and plus I needed some colour to offset the white sour cream. To be honest they were delicious and would do it all over again.
I would like to invite you to visit my blog, Anna's Table, where I posted some photos from this year's Ukrainian Festival held in Montreal,Canada. The photos can be viewed at http://annastable.blogspot.com
Looking forward to your future posts,
Oh WOW! These look amazing, thanks for the recipe!
ReplyDeleteI hope you enjoy!
ReplyDeleteI always get pierogi confused with piroshki. Pierogi in Russian are called Vareniki. And Vareniki, as far as I can remember can or are more intended to be the desert form of the same dish because you can put jam as the filling, hence the name vareniki may be derived from the Russian word varenye. But that also means that they are boiled or "varenyy" as we say in Russian. It's the same dumpling that can be made in a variety of ways to give it different names. I also like having cooked onions on top of my pierohi as well.
ReplyDelete