Showing posts with label pasta. Show all posts

Spinach Gnocchi

When I was younger, I actually would go over to the neighbors house every Friday since that was their gnocchi day and gnocchi just was not something we ate at home. I thought it was incredibly exotic (my mom ate stuff like chicken mole, gorditas, and enchiladas - how boring). I'm sure they were store bought, because I seem to remember them being a bit chewy, topped with a can of red sauce, but at the age of eight, with my discerning palette, I thought they were totally the best. thing. ever.


Fast forward about 10 years and I tried making some pre-made gnocchi remembering my love of it as a child. Sadly, the stuff from the grocery store was just not that good. Now, almost 20 years later, I decided to try my hand at making them from scratch. It's not a complicated process and I'm sure it would get speedier the more that I work at it. As it was, it took me about an hour and a half, but I'll be reaping the rewards for some time (we froze seven dinners worth and ate one that night), so I'm okay with it.

Cooked up in salted boiling water until they floated with an optional sizzle in a skillet, topped with either butter and grated cheese or your favorite sauce and you've got a flavorful, light and airy dough ball dinner. And as much as I love love love potato gnocchi, these spinach gnocchi can alleviate some of the guilt that you might get from eating a meal consisting solely of carbs. But (in my opinion, of course) I think that occasionally indulging in something delicious and not insanely healthful is nothing you should feel guilty over. But if you are tinged with guilt, remember, you're eating vegetables too!
Spinach Gnocchi

Ingredients:
Spinach, 12 oz
1 3/4 lb potatoes
1 3/4 c. all purpose flour
2 egg yolks, lightly beaten

Begin by cooking your potatoes, until soft, in salted boiling water. This should take about 20-25 minutes, depending on the size of your potatoes. While the potatoes are cooking, wilt the spinach in a large saute pan or pot. Once all the leaves have turned a darker green color and have completely wilted, remove from the heat. Once cooled, squeeze any remaining water from the leaves and chop fine. 


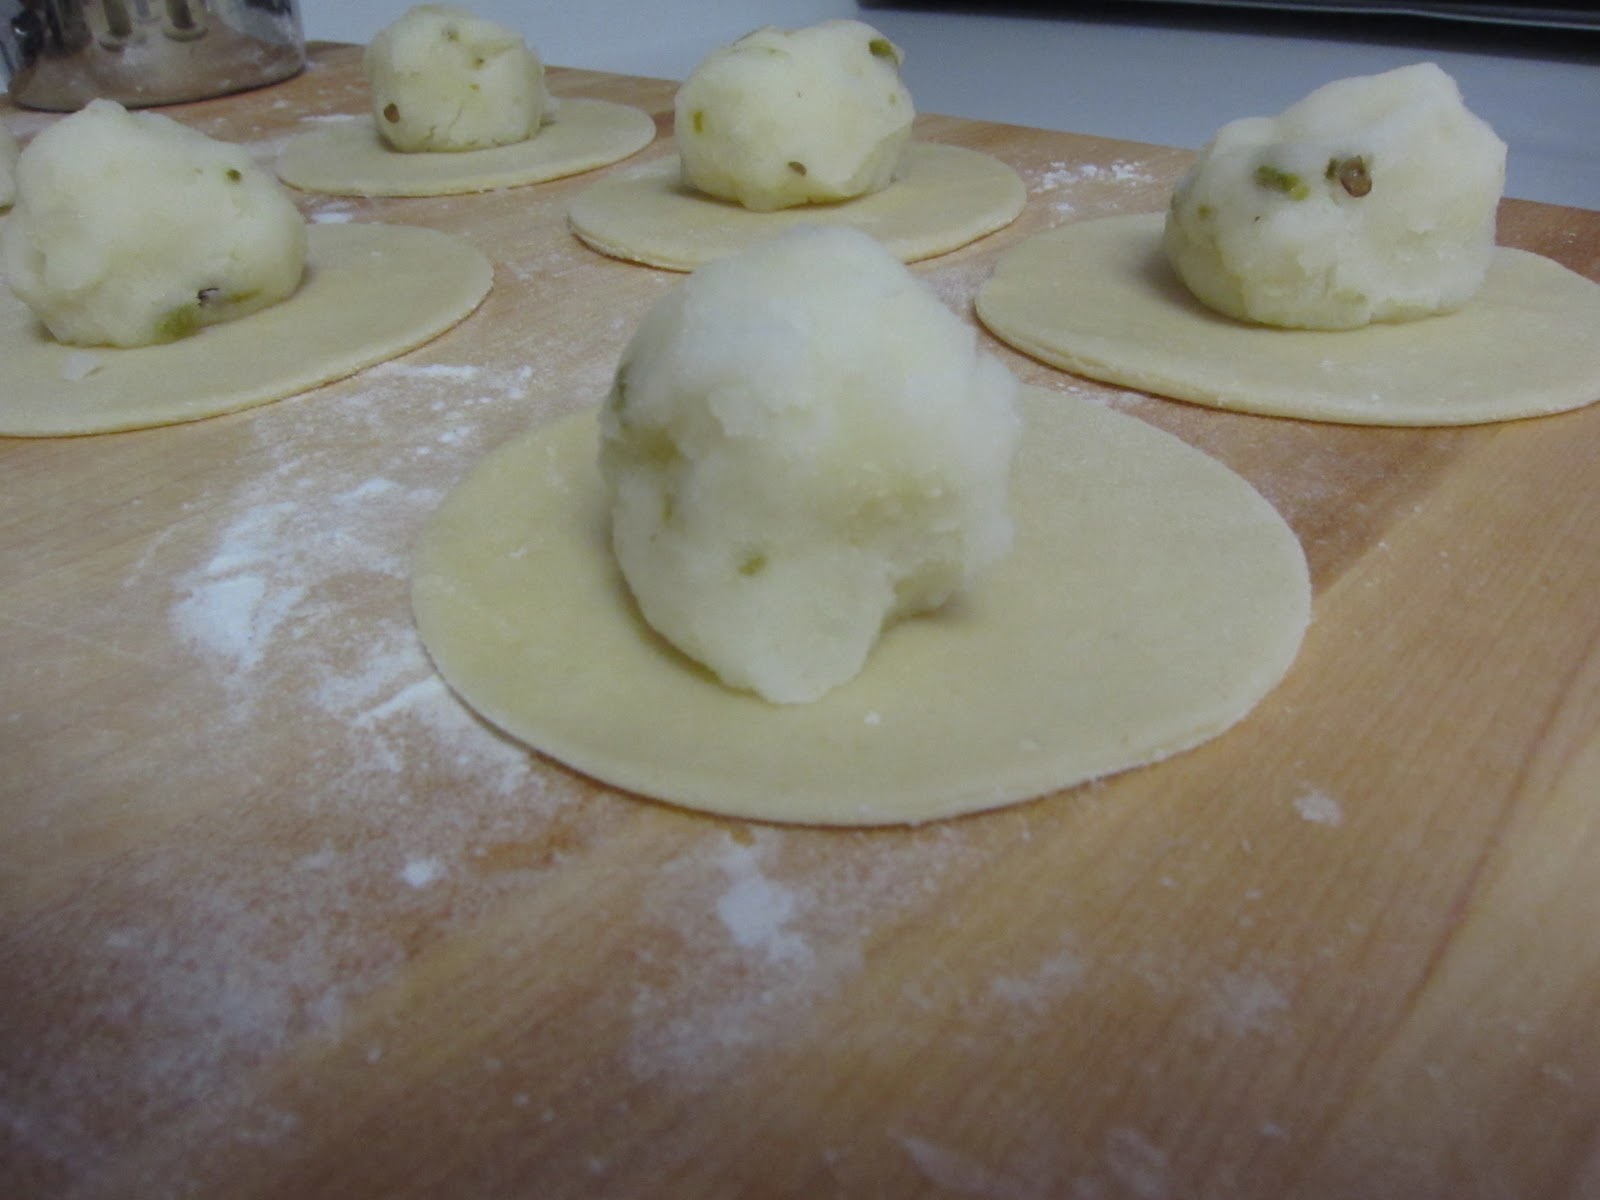
Once the potatoes are done, drain them and then mash. I used a potato ricer to get a finer texture, but you could also use a regular masher or fork. Add the flour, egg yolks and spinach to the potato mixture and season with salt. Then get in there and get dirty. With some additional flour standing by, begin to knead the mixture until it is incorporated together. It will still be a bit sticky, so keep whatever surface you are working on well floured. 


Break the large dough ball into smaller, easy to handle sizes to begin rolling into logs. Roll the logs into 2/3" diameter and then cut out the individual gnocchi (with a sharp knife!) to about 1/2 in length. Flour the gnocchi so that they don't stick together or to the board while you work on the rest. Continue until all the dough has been used up. 
To cook the fresh gnocchi, boil some salted water on the stove. Give it a stir to begin a whirlpool effect right before you drop them in - this will prevent them from sticking together and from immediately sinking (and sticking) to the bottom. Once they float you can remove them - they are done cooking. 
At this point, you can top them with you sauce and enjoy. Or you can add some olive oil to a skillet heated over medium heat and add the gnocchi to that pan, giving each a nice crispy outside while preserving that puffy, pillow-like ball of dough on the inside. Top with sauce (this shallot cream sauce, for example) or butter and enjoy!


To freeze the gnocchi for later use (which will taste way better than the frozen store bought, in my opinion), place the floured gnocchi on a large metal sheet pan (covered with parchment paper) and freeze. Once individually frozen, the gnocchi can be placed in bags or containers to be enjoyed later. We put 30 gnocchi in each container to yield 2 adult servings. Boil directly from frozen.

Spaghetti Squash

Spaghetti squash is one of those ingredients that I like to use (because ya'll know how we love pasta in this house!). It gives us a little more veggies and just switches things up on occasion. I've tried this squash with plenty of sauces, but my absolute favorite is this recipe.


Baked Spaghetti Squash with Vodka Sauce

Ingredients:
1 small spaghetti squash
1 recipe Vodka Sauce (recipe below)
1 lemon, cut into wedges (optional)
1/2 lb Italian turkey sausage, cooked into crumbles (optional)
Pecorino Romano cheese, grated


To bake the squash, you'll need to cut it in half lengthwise. Please only attempt to do this with a sharp knife as the squash is rather hard to cut and I don't want you all to get maimed.


Once cut, scrape out the seeds and the stringy portions from the center of the squash. You can reserve the seeds and bake them as you would pumpkin seeds (or toss them, your choice). Rub some oil onto a baking sheet and place the squash cut side down onto the baking sheet. Bake in a 350 F oven for about 45 minutes, or until the squash is tender and can be punctured easily with a fork or butter knife.


Remove the squash from the oven and allow to cool slightly before handling. When it is cool enough to touch (you can also use an oven mitt or oven-safe glove like I do because I am not quite so patient at this point), scrape the insides of the squash with a fork and remove the pasta-like strands. Place the strands of squash in a large bowl or smaller serving-size bowls and top with the vodka sauce. I like to serve with a bit of grated pecorino romano, chiffonade basil and a wedge of lemon which I find breaks up all the sweet flavors of the sauce and squash. Another option is to top with sausage crumbles; the heat from the sausage also compliments the sweetness of the vodka sauce & squash.

Vodka Sauce
adapted slightly from this Food Network recipe


Ingredients:
1/2 c. extra-virgin olive oil
1 small onion, chopped fine
2 cloves garlic, minced
1 stalk celery, chopped fine
1 carrot, chopped fine
2 (32-ounce) cans crushed tomatoes
2 dried bay leaves
salt and freshly ground black pepper
1 1/2 c. vodka
3/4 c. heavy cream, at room temperature
3/4 c. grated Pecorino Romano 


In a large dutch oven, heat the olive oil over medium heat. Add the onion and garlic and saute until tender, about 2-3 minutes. Add the celery and carrot and continue to cook until all the vegetables are soft, about 5 minutes. Season with salt and pepper. Add the cans of tomatoes and bay leaves and reduce the heat to low. Cover and simmer for 1 hour. Remove the bay leaf and adjust seasonings.


Stir in the vodka and reduce by a quarter, stirring often. Once reduced, stir in the cream and then the cheese. Stir to combine. Once heated through, you can serve or allow to cool to room temperature before freezing. The sauce can be frozen for up to 6 months.

Pasta Rustica

Nick went on and on about Pasta Rustica for quite some time. I, being the ignorant non-Italian, had no idea what Pasta Rustica was. So, when I put it on the weekly menu, I needed a starting point. I turned to his family cookbook and grabbed his Aunt Denise's recipe.


Making up the weekly grocery list, I realized that almost all of the ingredients were what we consider pantry items, so we actually didn't need anything for this recipe. I already liked it. Any recipe that can be made with easily found on hand pantry staples is one I love. I do like to experiment with odd ingredients and ethnic cuisines, but there is definitely something to be said for pantry recipes. I love to have these types of recipes as fall backs in case I'm stuck late at work or realize that I forgot an ingredient for another recipe I was planning to make.

And especially one this delicious. The creaminess of the cheeses, the spicy flavors of the sausage and  topped with sauce tastes like a crispy version of lasagna, but so much easier to prepare. It also freezes well, so don't let any of those leftovers go to waste!


Pasta Rustica
serves 6-8

Ingredients:
2 tbsp olive oil
1 yellow onion, chopped
2 garlic cloves, minced
3/4 lb. hot Italian sausage, casings removed (we used Nick's homemade pork sausage)
1 tsp. dried basil
1 tsp. dried oregano
1/4 tsp. red pepper flakes
1 can (28 oz) tomatoes in puree (tomatoes coarsely chopped and puree reserved)
salt, to taste
1 lb. penne pasta
1 1/4 c. ricotta cheese (we used re-hydrated Ricotta Salata)
2 c. Landana Mild Goat Cheese**
1/2 c. grated Pecorino Romano

Preheat the oven to 350F. In a large dutch oven, over medium heat, warm oil. Add onion and cook until golden, about 5 minutes. Add garlic and cook, stirring for about 1 minute. Add sausage and cook, breaking it up into bite size pieces, until no longer pink, about 6 minutes. Stir in basil, oregano and red pepper flakes. Add tomatoes with puree and bring to a boil. Reduce heat to medium-low and simmer, stirring occasionally, until thickened, 10-12 minutes. Taste and adjust seasonings. Lightly oil a baking dish*.

Cook the pasta until barely al dente and drain well.

In a large bowl, toss pasta with sauce, ricotta and the goat cheese. Spread in a prepared baking and sprinkle with Pecorino Romano. Bake until cheeses are melted and tips of pasta are crusty (about 30 minutes). Let stand 5 minutes before serving.

*We used one 9" x 9" baking dish and one smaller dish to freeze for a later meal. If you are making all of it at once, I recommend a 9" x 12" dish.

** This was a mild, semi-soft goat's cheese with a rich, buttery flavor.

Saccameno's Linguine with White Clam Sauce

I first had this dish several years ago at a friend's house. Noel (who's mom gave us this recipe) is a great host and cook. I remember saying at the time that I thought the pasta dish was delicious and wouldn't ya know? She ended up giving the recipe to me at my bridal shower. Yay for me - and for you, because now I'm sharing it.


It's a simple recipe, perfect for a weeknight meal when you want to feed your family something delicious but really feel like calling in for delivery*. It's light, flavorful and served with a salad and bread, makes a complete meal that's filling and healthy. It would also be lovely as a side dish.


We ended up making some semolina linguine that night, since it was a special night - our 5 month anniversary.
We don't need much to celebrate, and I really like homemade pasta. We also toasted with a bit of champagne. Like I said, it doesn't take much. :)
Saccameno's Linguine with White Clam Sauce

Ingredients:
1 lb linguine
1 tbsp butter
1 tbsp olive oil
1/3 c. onion
4 cloves garlic
4 cans chopped clams (juice and clams separated)
1 lemon, juiced
1 tsp. basil
1 tsp. parsley
1/2 c. finely grated Pecorino Romano
salt and pepper, to taste
 
In a large skillet or saute pan, melt the butter and olive oil together over medium heat. Once hot, add the onions and garlic and cook until transparent (about 5 minutes). Add in the clam juice, lemon juice, basil and pasley and simmer, uncovered, for 5 minutes. Next, add in the clams and cover. Continue to cook over low heat for another 20 minutes. After 20 minutes, uncover and add the cheese and salt and pepper to taste. Once you are satisfied with the flavor, toss in the cooked pasta** and serve, topping with more cheese and parsley if desired.

The prep work is minimal, so it literally comes together in 30 minutes. It definitely will get added to our regular meal rotation.

*Is it weird that I honestly never think of this? Sometimes I do ponder making boxed pasta with canned sauce and calling it a night. But it never, ever occurs to me that I could call someone to deliver dinner.

**I used homemade pasta. To save time, you could use boxed pasta or pre-made homemade pasta. The results of either would still be delicious.

Thanksgiving ReMix - Turkey Cranberry and Ricotta Stuffed Shells

My fab hubs came up with this one night and it sounded so good we used up the last remains of our turkey to make this. It was delicious. Creamy, meaty, savory, sweet, spiced. Yum!


Ingredients:

4 oz. roasted turkey breast, shredded or sliced very thin
1/2 c. cranberry sauce
1 1/2 c. Ricotta cheese (we used Ricotta Salata rehydrated to have the traditional Ricotta consistency)
18 Jumbo Shells
salt and pepper
nutmeg


Mix the turkey with the cranberry sauce and Ricotta cheese. Add a pinch of nutmeg, pepper and salt to taste.

Boil the pasta shells in a pot of salted water until al dente.


Fill the shells with the filling and place in a shallow oven-safe pan lined with gravy.


Top with the gravy (recipe below) and pecorio romano, bake in a 350 F oven until the cheese browns and bubbles - about 30 minutes.


Gravy


Ingredients:
2 tbsp butter
1 shallot or 1/8 sweet onion, diced fine
2 tbsp all purpose flour
1 c. turkey stock
1 tbsp parsley
1 tbsp heavy cream
pinch nutmeg
salt and pepper

Melt the butter in a saucepan over medium-low heat. Cook until the onions are transparent. Stir in the all purpose flour and mix to combine with the butter. Gradually add in the stock. Whisk to combine the stock with the rue. Add in the parsley and cream, nutmeg and salt and pepper. Cook over low heat until desired consistency.

Ukrainian Pyrohi (Pieroghi) & Pyrohi with a Twist

There are some foods that hold special memories, that take you back to a certain time or place. Pyrohi are one of those for me. I remember devouring them at my grandparent's house as a child. I learned to ride my bike (sans training wheels) by having my parents tempt me by saying "Olga's Pieroghi!" as they ran ahead of me and I tried to catch up. Engrossed by the thoughts of buttery, cheese and potato filled pockets, I completely forgot about my unbalanced self and raced to two wheels in no time. The smell of onions sauteing in butter on the stove top still reminds me of home and Olga's (my grandmother) kitchen.


Since I grew up, I've tried several varieties: the can't be topped pyrohi made by little old ladies in church basements, the store bought kind from your grocer's freezer, and some bought at specialty markets with unique added flavors. There is also a "poor man's" version that my dad makes, which is basically the same ingredients deconstructed in a mixture of noodles as opposed to pinched into dough rounds. It's equally delicious and I'll have to share it with you sometime.

I wanted to give homemade pyrohi a try, not only because I imagine that they will taste more like the little old lady variety, but also because they are a great weeknight dish since they freeze so well. Once they are individually frozen onto sheet pans (don't forget the parchment paper), I put a few into zip top bags and placed them in the freezer. On busy weeknights, it's so easy to boil a pot of water and throw in some frozen pyrohi, saute some butter/olive oil and onions and sit down to a nice, home cooked meal 15 minutes later.

This leads me to my current undertaking: making homemade pyrohi.  The recipe below is what I received from my Aunt Stephanie (a young church basement pyrohi pincher) at my bridal shower. I had to have some tweaks (for my allergy), but I've mostly followed this exactly (the items I've changed will not be in italics).

Ukrainian Pyrohi
(yield: approx. 3 to 3 1/2 doz)

Dough

1 egg
2 c. flour
1/2 c. water
1 tbsp. margarine (for which I subbed plain ol' butter)
1 tsp. salt

Mix together and knead for about 5 minutes. You can also let your mixer and dough hook do the work. Let dough rest on a floured board for about 1/2 hour. 


Filling


Cook 5 or 6 potatoes (pared and cubed). Mash, add salt and pepper to taste (do not add milk); add 3 or 4 slices of cheddar, American or your choice of cheese (I used Manchego* here). Mix well until cheese is melted. I like to saute butter (I used olive oil) and onions (1/2 yellow) and put some into the potato mixture. Scoop potatoes into 1" balls and let cool.

Making and Filling Pyrohi

Roll out dough about 1/8" thick and cut in 3" rounds (use a donut cutter). Put 1 tbsp. potatoes on a round and pinch them shut. Use a little flour on your fingers if the dough is sticky or if it doesn't seal right away. No need to put water on the edges before sealing. I worked in batches so that the dough wouldn't dry out. 


Put completed pyrohi on a lightly floured surface until ready to cook. If not cooking for a while, cover the pyrohi with a dish towel until ready to cook so that they don't dry out.


Cook in a large pot of boiling water, stirring gently until pyrohi come to the top of the water and then let simmer for 3 or 4 minutes; drain, serve with sauteed butter (again, I used olive oil) and onions. ENJOY!

The other option is to fry them. I caramelized some yellow onions in some olive oil and once they were done, added a bit more olive oil and sauteed the pyrohi until they were cooked through.


To kick these up a notch, mix the pyrohi filling (as directed above) and add one roasted, peeled and diced jalapeno pepper.  The spiciness goes well with the caramelized onions and it really is an great twist on the traditional version (although I can't say enough about the original).


*Manchego is a sheep's milk cheese that has goes really well with potatoes and melts well. There are also sheep and goat's milk cheddars available, but our nearest specialty cheese store is an hour away.

Basil & Goat Cheese Ravioli


I'm sure you are totally sick of me posting about goat cheese ravioli. Really, how many different variations can one have on the matter? Apparently, to date, three.

1. Goat Cheese & Spinach Ravioli
2. Goat Cheese & Beet Green Ravioli

My first two recipes were delicious, but I didn't have any greens on hand, but had a free afternoon and a pound of goat cheese and really wanted to make some ravioli for a quick and easy weeknight dinner later. What to do? Head outside to the patio and trim a few basil stems from a plant that had been growing out of control.

I used the same base recipe as the previous versions and the pasta recipe I used here.

The filling:

1/2 lb chevre (I needed a bit more than the last versions since there weren't a ton of greens to bulk it up)
1/4 c pecorino romano, grated
salt and pepper
pinch of nutmeg
handful of fresh basil leaves, chiffonade

Mix all the filling ingredients together, letting the cheese come to room temperature to make it easier to control the amount in each ravioli. The filled ravioli can be frozen and tossed into boiling water straight from the freezer for a very quick and painless dinner on those nights when you just can't be bothered.


Unlike the other goat cheese raviolis, we served this version with a red (marinara) sauce. I'm looking forward to the cooler weather (and therefore cold weather squash varieties) so I can try my hand at pumpkin ravioli.