Showing posts with label holidays. Show all posts

natural egg dyes - success and failures


 This year, I wanted to give natural egg dyes a try. I read tons of recipes online that used a variety of different fruits, vegetables and spices. None of these sites, however, had any actual examples of dyed eggs (except one, which was a super done up mag photo - i question it's authenticity). It seemed people loved posting recipes for natural egg dyes, but no one actually bothered to post the eggs. Did they suck? Did the recipes work? I tried seven this year. Here are the successful attempts (all of these were left in for about 20 minutes, except for the cabbage, which was left in the dye for an hour):


 As for our not so successful attempts: carrots (for orange) did nothing, spinach (for green) - nada, cranberries - nope. Next year I think I will get some dollar store paprika for orange (I thought about it this year, but didn't want to run out and definitely didn't want to use our good Penzey's stuff for egg dyes). I'd also like to try and mix maybe the turmeric and the red cabbage to see if I can get a green egg out of it. And possibly, although only if I can find inexpensive frozen berries, raspberries for a more red-pink.

For now though, I'm happy with our little egg experiment. I think they are cute, pastel, soft colors and don't have any weird ingredients. It was kind of interesting though in that they didn't come out in the same colors they dried:

blueberries: these came out more purple, and as they dried they turned this deeper blue hue.

turmeric: they came out more gold, but once dried ended up as a nice, soft yellow


red cabbage: this surprised me the most. it came out much more purple and dried this lovely robin's egg blue.


beets: came out pink, as i imagined. the eggs i pulled out quickly dried more slight purple pink. the ones i left longer in the dye, assuming i would get a darker, more vibrant pink, ended up drying a reddish-brown.


Club Baked: Sawdust Pie & Homemade White Chocolate

This week's recipe is hosted by Tessa of The Cookin' Chemist and she selected Sawdust Pie. I'll be honest, I was a bit hesitant to try this one. The name was not the most appetizing and there wasn't a photo in the book indicating what to expect. But since I was busy studying for my licensing exam and missed the last two Club Baked picks, I thought I should give this a try. And I'm so glad I did!


The pie itself was easy to assemble with some prep - making the pie crust and white chocolate. (Sidenote: these two steps took longer to make than the actual pie, which shows you just how easy and quick this pie goes together) Due to that pesky cow's milk allergy, I can't have regular white chocolate since it contains milk powder. I thought about omitting the white chocolate all together and just using dark, but I also really wanted to try to make the white chocolate as I noticed a few other Baked recipes used them as well. The homemade white chocolate was the only substitution that I had to make in the entire recipe and I think it helped make the pie less sweet overall.  

Recipe for white chocolate at end of post.


For the pie crust, I stuck with the basic recipe found in Baked: Explorations with one minor change. I substituted vanilla sugar for plain granulated. I keep vanilla sugar in my pantry and sneak it in to all kinds of baked goods and the pie crust seemed like the perfect place.


Once I had the pie crust assembled, the rest was easy peasy. A few pulses of the food processor on some graham crackers and pecans, a little shaving of white chocolate, a handful of dried, unsweetened coconut and some scoops of sugar and I was almost done! I'll admit I was concerned about the coconut flavor in this pie. I like fresh coconut, but the dried stuff I normally have a texture aversion to, but in this pie, it is barely noticeable with all the other strong flavors and doesn't stand out texturally with everything else.


I couldn't help sneaking in 2 ounces of  semi-sweet chocolate, though. I was so happy I added this when I tasted the pie. The bite of the semi-sweet chocolate really complimented the nutty sweetness of the pie. After adding the (6!) egg whites and filling the pie crust, it was time for the oven. (Don't worry about those 6 egg yolks, I feel some ice cream making in my near future...Come to think of it, a scoop of cold ice cream would go fabulously with a warm slice of this pie...)


This pie was easy to make and tasty to eat. Sort of a less sweet, less syrupy version of traditional pecan pie. I served this pie warm, with a big, fat dollop of homemade whipped cream to some of the hub's friends. After looking skeptically at something called "Sawdust Pie" and quizzing me on ingredients a few times, each took a slice and cleaned their plates. Success!

Thanks to Tessa for choosing this recipe that I never would have given a second thought without her prompting. It's a great fall pie and would be a great dessert offering for Thanksgiving. Check out her blog for the recipe. Also, check out other baker's links here.


White Chocolate 
adapted from this recipe


2 oz. food grade cocoa butter - They carried this at my Whole Foods, but you can purchase online as well)
1/2 tsp vanilla extract
1/3 cup powdered sugar
1/2 tsp goat's milk powder
itty bitty pinch of salt


Melt the cocoa butter in the microwave in a microwave safe dish. I used a Pyrex container with a lip to pour so it is easier to fill the molds later. Start with 2 minutes and add 1 minute at a time until all the cocoa butter solids are liquefied.

Using a pot holder, remove the cocoa butter from the microwave and stir in the extract, sugar, milk powder and pinch of salt. Continue to stir until all of the ingredients are incorporated and melted into the cocoa butter.

Pour the mixture into mold. I used silicone cupcake molds that I had on hand. An ice cube tray would work, too if you don't have candy molds. You could buy a fancy candy mold if you want, but it's not necessary. Then simply place the molds into the fridge to harden and a few hours later, you have great tasting, smooth, homemade white chocolate. :)

Club Baked: Sunday Night Anniversary Cake


Yesterday was my one year wedding anniversary. Can you believe it? One whole year. It went by so quickly I can hardly believe it myself. A new job, quitting old jobs, being unemployed, moving across the country. It's been super busy and crazy, but equally as fun. We've been truly blessed this past year and I thought it would be nice to celebrate at home - with a nice dinner, some champagne, netflix, and this Sunday Night Cake from Baked: Explorations.


I know! You are supposed to eat your wedding cake on your one year anniversary, but I couldn't eat my wedding cake on my wedding day. Well, I could eat the "groom's cake" that my lovely aunt made for us, but not the tiered one, so there's no top tier for us to eat. And really, I don't know the reason or tradition behind eating the old cake, but for me, wasting freezer space on old cake for an entire year seems pretty silly, especially when you can make fresh, yummy cake for the occasion.


This Sunday Night Cake was noted to be pretty easy and quick to make - which is why it is called Sunday Night cake and not Friday Night cake. It was painless - even for me. I was surprised by how fluffy the batter was - I had to restrain myself from just liking it right out of the bowl. I did substitute strained sheep's yogurt for the sour cream as I've done in the past, but that was my only substitution in the batter. I baked mine for 40 minutes in our toaster oven although it came out a bit too toasty. Next time I'll be sure to check on it when it's coming up on 30 minutes.


I baked my cake in a round pan (8 or 9 inch-ish) since that's what I had. It occurred to me later that I probably could have used a glass baking dish that I did have, but oh well. I think that if I had made it in the square pan, or in a springform pan (which would have had taller edges, allowing the cake to rise higher?) that it might have grown a bit taller and been more airy. But we're all short in this house, so I guess the cake fits in. 


For the frosting, I used 62% Cocoa dark chocolate instead of the unsweetened the recipe suggests because that's what I had on hand. I don't know what the unsweetened version tasted like, but this was amazing. I did manage to frost the cake, but I for sure licked the bowl when I was done. It wasn't too sweet as cake frosting usually are and, like the donuts, the flavor of the frosting complimented the spice in the cake in the most delicious way possible.

I was pleased with the ease of preparation and flavor of this cake. It was a bit on the dense side for me, but still moist despite me baking it into obliteration. I was a bit hesitant while frosting the cake as it seemed like a crazy amount, but was glad I went all out. Because the cake is so dense, for me, the added frosting helped balance out the cake to frosting ratio, especially since there are no layers to get a bit more frosting in there.


We served this with a dinner of homemade calzones (as requested by the hubs), sauteed french beans and of course, a glass of champagne to celebrate our one year and toast many more to come.

To see how this turned out for the other bakers, check out this link. For the Sunday Night cake recipe, check out Julie's blog, Little Bit of Everything. Thanks, Julie for hosting!

1 year.


Today I'm celebrating my one year wedding anniversary. So, this week, for August Break, I'm recapping my honeymoon pics. Good thing this challenge doesn't have rules, because I am pretty sure this is cheating. Whatevs. Check out these posts (one, two, three, four, five) for a look back at some of our first year adventures!


Above photo by Catherine McKinley Photography.

Happy Father's Day!

Happy Father's Day to all the dads out there, but ya know, I'm partial to mine - so Happy Father's Day, Dad!
Cake made from scratch by my talented little brother.

Happy Valentine's Day!


Hope you all are having a great day celebrating with your Valentine. Mine is in the kitchen making pesto...mmm...

Last night, for an early V-day dinner, we made a roasted leg of lamb ($3.99/ lb!) with a red wine sauce which we served with some roasted cauliflower covered in a Drunken Goat cheese sauce and a loaf of ciabatta bread (no, we didn't eat it all last night, silly).


This morning we had a yummy breakfast of crepes filled with  fresh strawberries in maple syrup and topped with homemade sweetened whipped cream. And, of course, a cup of coffee. Perfect start to the day.

It's my Birthday and I'll Pie if I want to!

Me and pie have had a love affair for quite some time. I love the variety that can be found in pies. I suppose one could argue cake can be equally interesting, but I usually find cakes (especially with icing) to be too sweet for my taste. So, if I had the choice, I would choose pie every time. Which is why, on my birthday, my mom would make me this amazing French Silk Pie instead of birthday cake.


But sadly, this is the first year in 27 years that I haven't been home for my birthday. Which meant I was not getting a mom made pie or dad made dinner.  So I did what every woman with a birthday induced chocolate craving would do, and I got the recipe.


Ingredients:

1 lb. butter, softened
1 1/2 c. sugar
4 squares baker's chocolate
2 tsp. vanilla
1 precooked pie shell
4 pasturized eggs

Suprisingly, I had everything on hand. Plus, it's such and easy and foolproof recipe, I promise you can't screw it up.

Start out by making and cooking the pie shell. It will need to be cooled before you can add the batter, so chill in the fridge or let cool on the counter to room temperature before starting your batter. I'm still working out the kinks of pie crust making, so mine was a little misshappen, but I assure you, it did not affect the flavor. I also kept my crust a bit thicker since I like it, especially with this pie.

Once the crust is cooled, cream the butter and sugar in a mixing bowl.


Once it is creamed, add the melted (but cooled!) chocolate and the vanilla extract.


Once they are thoroughly mixed together, add one egg at a time and after each egg is added, beat for 5 minutes on medium.


This allows the egg to smooth and lighten the sugar-butter mixture. Once the eggs are added and beaten, your batter is ready to pour into the cooled pie shell. I used one large pie shell and one smaller one that was just for me. Because it's my birthday and I know Nick will eat half of every slice I get for myself, even though he "doesn't like pie." *eyeroll* :)


Cover and refrigerate. My mom recommends letting it set in the fridge overnight, but she told me that 2 hours is the true minimum - she must know how impatient I am when it comes to pie.


Hope you all had a great 2010 and I wish you an even better 2011!

Merry Christmas!

I hope you all had a Merry Christmas. Ours was a whirlwind tour of western Pennsylvania and Ohio. We hung out with our immediate families in Pittsburgh and then went to Ohio to visit with Nick's extended family - all 80 of them! 
The Steel City


The Sibs
But we're glad to be home. And our itty bitty apartment is starting to feel a little like home even though we know it's not a forever place. We even got some more "home" things that make our home feel that much more special. Even though I'm an interior designer, I really hate buying things for our house. I don't mind buying bigger items and practical items, but photos and accessories I want to feel attached to - something linked to a vacation, gift, or other memorable event.


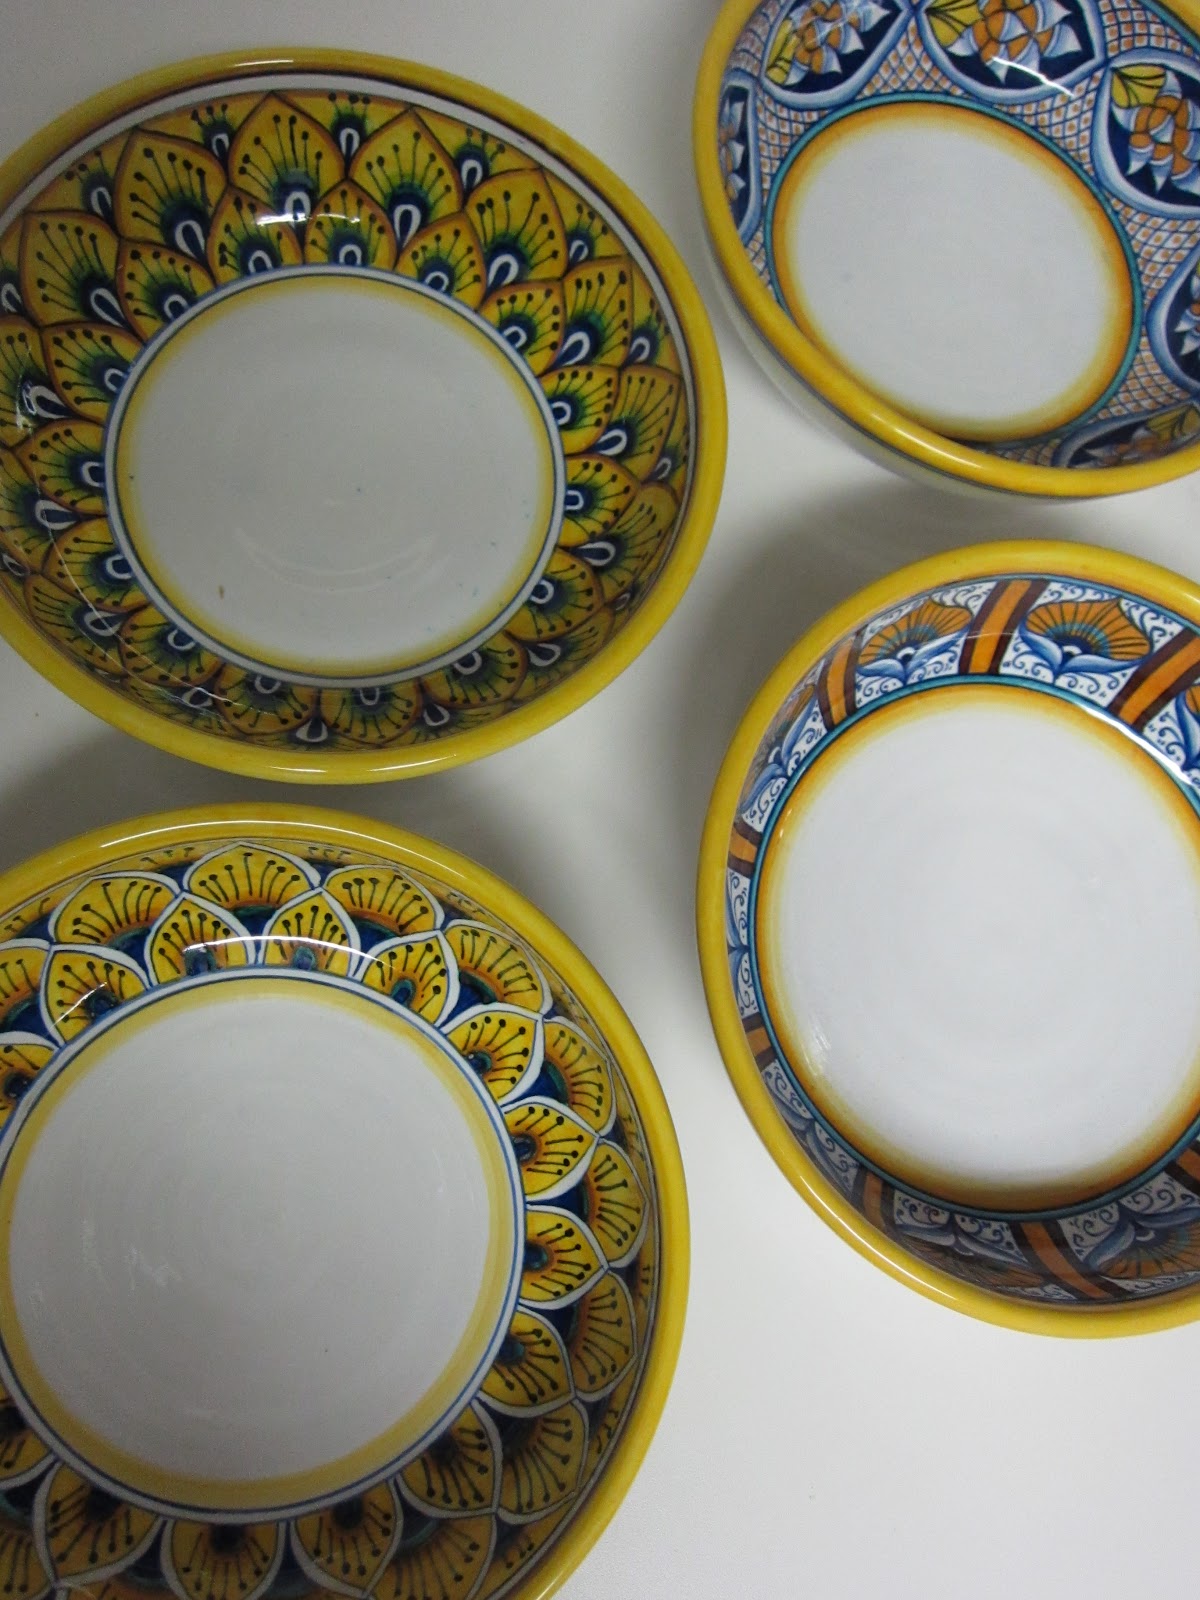
So, it was just perfect that Nick's aunt/godmother gave us these beautiful bowls. Using them with our dishes adds warmth to the table and a pop of color. It's just the thing I would have bought to accent our kitchen and dining area if I would have chosen something myself. But I love them that much more since they were a gift.


Each one has a different design and this on the bottom:


It translates to "Painted by Hand in Deruta." I love our wedding date on the bottom also. I am sure we will get plenty of use out of these - look for them in some upcoming posts!

We also got some bedroom items - perfect since we've neglected every room other than the kitchen. We're waiting for this to come in the mail. I think it's so cute, but not too girly, since now I share the covers with a man.
via Pottery Barn
via Pottery Barn
While we were in Pittsburgh, we couldn't help but do a little shopping for ourselves. And what did we get? I'm sure not what most people pick up on vacation. Semolina, "00" Type Flour, and Durum Wheat Flour. We've heard all make great pastas, so we're going to make small batches of each and hold a taste test to see which we like the best.


"00" Type, Semolina, Durum Wheat
We also got some beans and dried mushrooms, since they are ridiculously cheap in Pittsburgh.


And some fun loose teas.


Down in Florida, we stopped at Whole Foods to pick up a basket full of sheep and goat's milk cheeses and spotted a variety of Dogfish Head beers. We picked up four different types we can't wait to try. We're going to review them and try to pair them with some meal ideas since they are expensive - but sooo good!


What did Santa bring you for Christmas? Are you settled in from the holiday craziness yet?